Available Software
LSUE negotiates with vendors to make software available to students, faculty, and staff for discounted rates or, in some cases, for free. The software listed below is available for use associated with campus related activities and possibly even personal use. Additional software is utilized throughout departments on LSUE's campus that would not be reflected here given the software's specific role.
Review the software grid below to find the best software option for you. If you do not see the software title you need or have questions around access or usage, please Contact OIT.
Adobe Creative Cloud (or "Adobe CC") is a suite of products, services, and tools, including Adobe Acrobat Pro, that together allow for many utilities across all kinds of projects, from creative to administrative. Some of the more common products include Adobe Acrobat Pro, Adobe Sign, etc... A full list along with descriptions can be found below under Products and Services Available.
Adobe Creative Cloud (or "Adobe CC") is a suite of products, services, and tools that together allow for many utilities across all kinds of projects, from creative to administrative. Some of the more common products include Adobe Acrobat Pro, Adobe Sign, etc... A full list along with descriptions can be found below under Products and Services Available.
Adobe Creative Cloud (or "Adobe CC") is a suite of products, services, and tools, including Adobe Sign, that together allow for many utilities across all kinds of projects, from creative to administrative. Some of the more common products include Adobe Acrobat Pro, Adobe Sign, etc... A full list along with descriptions can be found below under Products and Services Available.
The Ally plugin for myCourses/Moodle automatically checks accessibility of course materials using WCAG 2.1 AA (Web Content Accessibility Guidelines) standards and provides instant feedback that can be viewed in the course. This tool also provides step-by-step instructions to improve accessibility of materials and alternative formats that students can download (this can be disabled for individual items). The Ally tool adds a link to a full accessibility report in the Course Tools area, and this report displays the course's overall accessibility score, a summary of the course content, and issues that can be instantly fixed.
Instructors do not have to turn on this tool, and the course accessibility report will be imported with a course if it is copied or moved in myCourses. Currently, Ally checks files in the following formats:
- Microsoft Word
- Microsoft PowerPoint
- OpenOffice/LibreOffice
- Uploaded HTML files
- Images (JPG, JPEG, GIF, PNG, BMP, TIFF)
- WYSIWYG/VTBE (Atto editor) content (results only available in the Course Accessibility Report area)
- embedded YouTube videos (will check for captions; automated captions not considered accessible)
Ally performs an immediate check when a file is uploaded to the course. Results appear next to the uploaded item and in the accessibility report within 15–90 seconds. Icons appear next to the uploaded items that indicate the results of the accessibility check. Users see different Ally icons depending on their role in the course, and only instructors can access the accessibility report in Course Tools.
Faculty Getting Started
Ally is available to LSUE faculty through Moodle/myCourses. For instructions and tips on Ally for faculty, please visit the MyCourses Training course within Moodle/myCourses. If you would like access to this training course, please contact OIT.
For more help with using Ally, see the Ally provided page - Ally Help for Instructors.
For additional information on Panopto, please contact OIT.
Students Getting Started
For PDF, Word, OpenOffice, HTML or PowerPoint files, Ally produces several alternative formats of the original file such as electronic braille, audio, or tagged PDF. Students may download a file version best suited to their needs by opening the drop-down menu next to the file and choosing the "Alternative Formats" option.
For information on using Ally as a student, see the Ally provided page - Ally Help for Students.
Student Email
Student email for LSUE is hosted through Google with Gmail. Student accounts are automatically created when a student is admitted to LSUE. Setting of your initial email password is done through myLSUE and clicking on the Email tab. From there, click the “Reset Password” link underneath the Gmail icon to set your initial password value. To login to student email, visit Gmail hosted by Google, enter your LSUE email address, and follow the instructions.
Moving forward, if you forget your email password, you can log back into myLSUE and then click on the Email tab. From there, select the "Reset Password" link underneath the Gmail icon to reset your email password value.
Faculty/Staff Email
LSUE faculty and staff email is hosted within the cloud and Microsoft Office 365. Faculty and Staff myLSUE Accounts are created upon hire by the University. The password for email is your LSUE Bengal Account password, which is the same password used on-premises to authenticate to your computer, on-campus wireless network access, etc. To login, visit the Employee Hub, select the Email Web Access icon, and enter your email address (username@lsue.edu) as your username.
Email accounts can be accessed in one of several ways:
- The Microsoft Outlook client, which is installed on all LSUE faculty and staff computers.
- Outlook Web Access (https://www.lsue.edu/office), which can be accessed on or off campus from any device's web browser.
- Mobile devices can be configured to access LSUE email.
For recovery of deleted email messages, faculty and staff have options as outlined on the Faculty and Staff Recover Deleted Email Messages in Outlook on the Web page hosted with Microsoft. These options include being able to sometimes recover email after it has even been removed from your Deleted Items folder.
What is Examplify ExamSoft?
ExamSoft is a secure testing solution that is utilized for certain exams at LSUE. This software enables secure testing on student computers by blocking access to programs, files and Internet usage during the exam.
ExamSoft is used within different academic areas on campus and made available through a module configured from within Moodle / myCourses.
Need Assistance?
For faculty assistance with ExamSoft or Moodle / myCourses integration, please contact the Faculty Technology Center (FTC).
iClicker REEF is an application faculty may utilize within their course that works with your mobile device (iOS or Android) and can also be accesses through a web browser, allowing students to participate during in-class polling sessions.
Create an iClicker REEF Account
To be able to participate with iClicker REEF, you will need an active subscription. You can create a REEF account and access it at any time by downloading the mobile app on a smart device via the App Store or Google Play, or by visiting iClicker.com on a web browser. If you already have a REEF account, use it! Students should not create and use more than one REEF account as you will only receive credit from a single account.
Pay for Access to REEF
Upon signing up with iClicker REEF, you will have a 2 week free-trial period. After that point, you will need to purchase a REEF subscription or obtain an access code if you want to participate in iClicker sessions with your mobile device, tablet, or laptop.
Learn more about your options for purchasing a REEF subscription or obtaining an access code by visiting www.iclicker.com/support.
Contact the LSUE bookstore with additional questions.
Lumen Learning indicates that their purpose is to help higher education institutions improve affordability, access and student success by supporting wide-scale adoption of open educational resources. Lumen Learning provides low-cost open courseware, guidance and support to help institutions transition high enrollment courses to open educational resources.
Waymaker is courseware provided by Lumen Learning and utlized at LSUE to provide impactful learning tools for students and instructors, packaged with the best available open educational resources and innovative learning design.
Waymaker is a module available and configured from within Moodle / myCourses at LSUE.
Faculty can reach out to Lumen Learning Support or contact the Faculty Technology Center (FTC) to get started.
McGraw-Hill Education Connect is a robust toolkit of learning resources for faculty
available within Moodle / myCourses. This product integrates all of your digital
products from McGraw-Hill Education with Moodle / myCourse for quick and easy access
to best-in-class content and learning tools.
McGraw-Hill Connect is designed with the flexibility instructors need, to unlock the potential of the student population. Connect provides opportunities for both formative and summative assessment.
Access to McGraw-Hill Campus
Faculty can add the McGraw-Hill Campus activity directly within your Moodle / myCourses course.
For "How to" instructions on McGraw-Hill Connect, faculty can visit the MyCourses Training course within Moodle / myCourses.
Need Assistance?
For faculty assistance with McGraw-Hill Connect or Moodle / myCourses integration, please contact the Faculty Technology Center (FTC).
Employees can save up to 10% off Surface devices and 30% off Microsoft 365 subscriptions through the Microsoft Workplace Discount Program.
For additional information around the program, please visit the Microsoft Employee Discount Program page.
Microsoft Bookings is an online application included for free with an employee LSUE Office 365 account. Bookings allows someone to schedule an appointment with you without the need for a phone call or email.
Within the Bookings portal, you can manage your appointments, such as handling cancellations and rescheduling, sending appointment confirmations/reminders, all while automatically updating your Outlook calendar.
Eligibility
- Available to: Faculty, and Staff.
Accessing Bookings
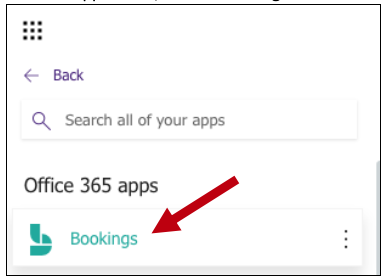
Microsoft Bookings can be access through LSUE's Office 365 Portal.
In the All Apps menu, choose Bookings.
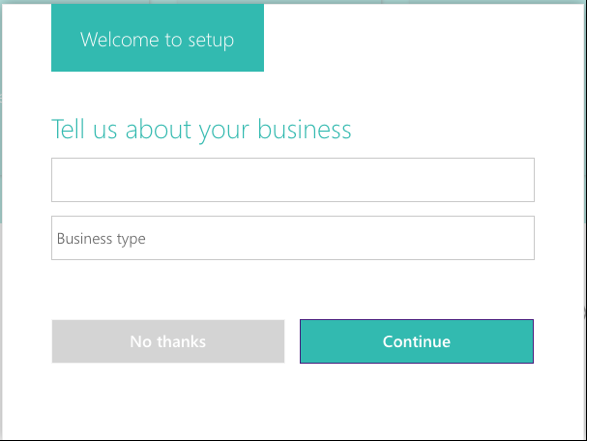
Microsoft Bookings will open. Click the Get it Now button to begin. The next page will ask for two pieces of information: Business name and Business type. Put in your business name (or your First and Last Name). Business Type is not required. Click Continue.
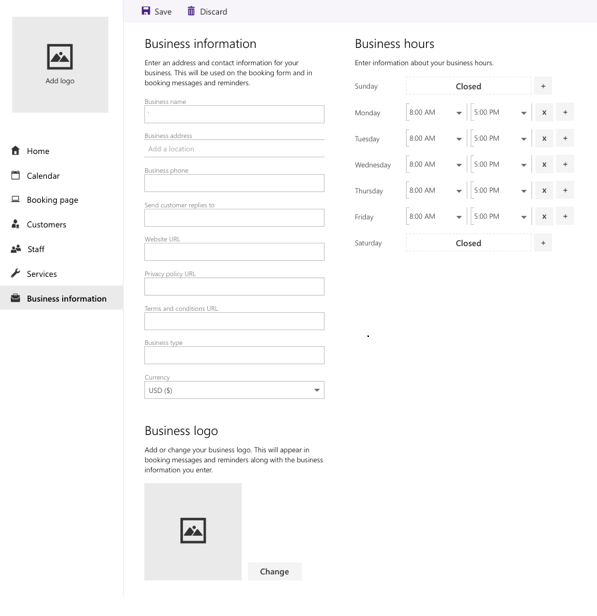
Once your Bookings page loads, the first section you should work on is Business Information. Click Business Information in the left menu.
On the Business Information page, you can enter your business address, other contact information, upload a business logo, and set up your business hours.
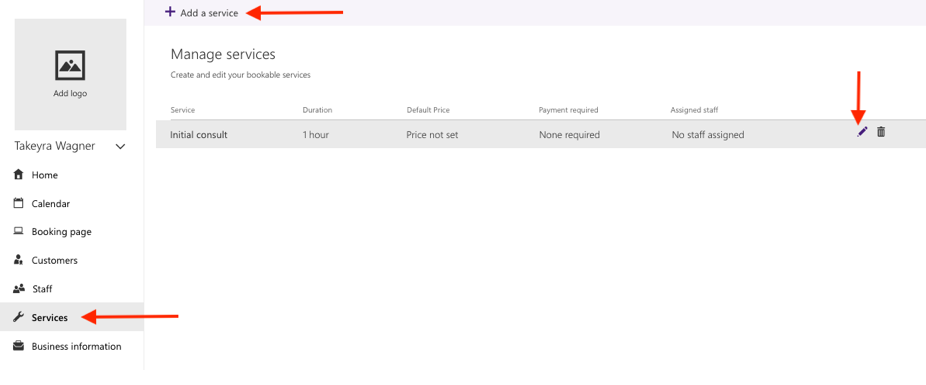
Next, set up your service offerings. Click Services from the left menu.
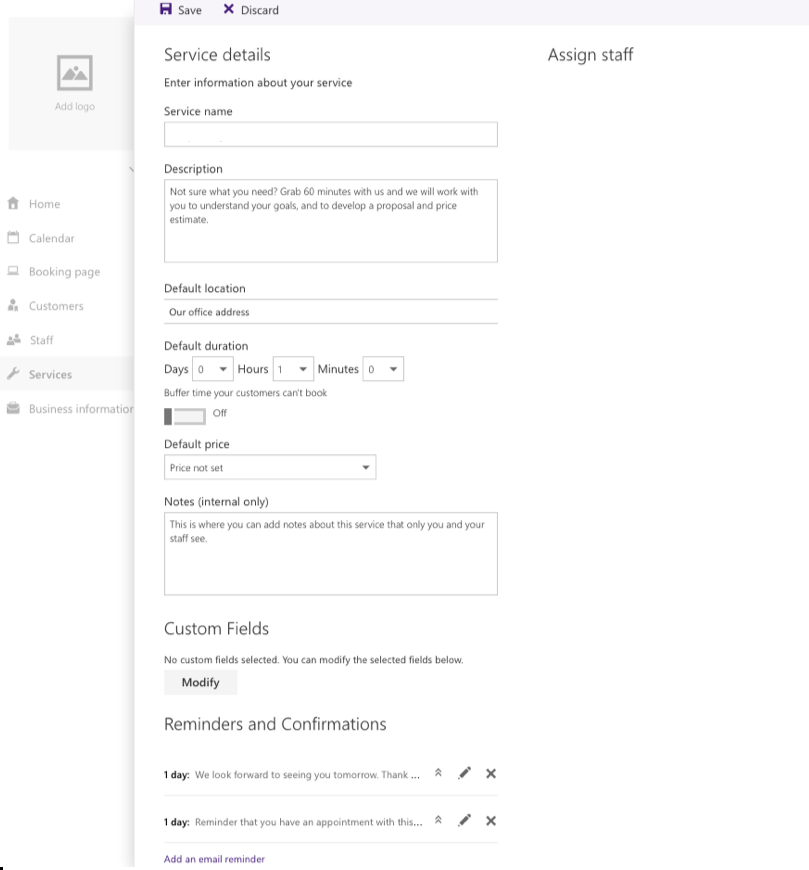
By default, Microsoft Bookings will add a service called “Initial Consult”. You can click the pencil next to this service and make it your own, OR you can add a new service by clicking Add a service at the top of the screen.
Once you’re on the service-editing page, enter your service details including name, description, and location. When you start typing an address in default location, suggested locations will populate.
Below are explanations for the other fields on the service-editing screen.
- Duration: You can enter how long you want the duration to last in days, hours, minutes, and set a buffer time when customers cannot book.
- Reminders: You can have the system send customers email reminders before their scheduled appointment. Click the pencil to edit the text.
- Leave Publishing options checked.
- Online Scheduling options:This is where you can manage the settings for when customers can book services.
- You can choose to use the default scheduling policy by leaving the option checked, OR
- You can manage the settings for your scheduling policy by unchecking the option. If you choose this option, we recommend setting the Minimum lead time to 24 and the Maximum lead time to 30 days.
- Don't forget to click Save at the top of the Service details page.
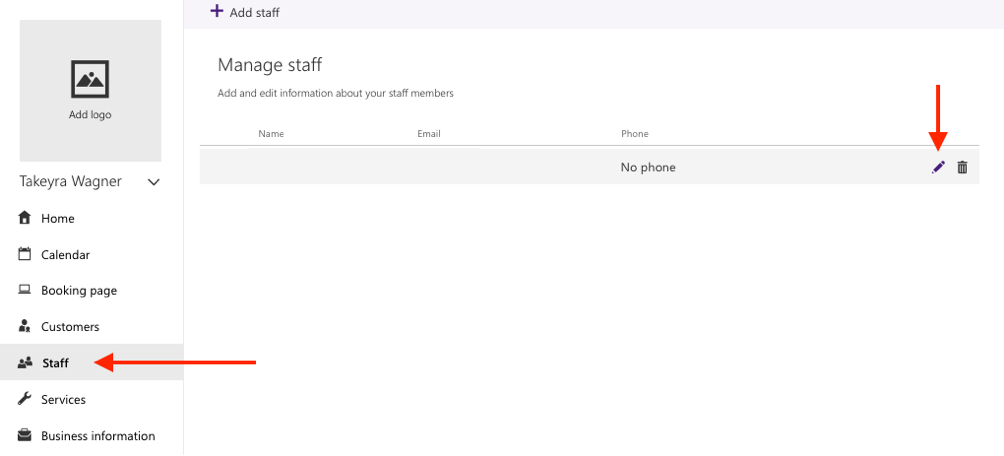
After adding and saving your service(s), click Staff from the left navigation pane. Click the pencil next to your name to edit your information.
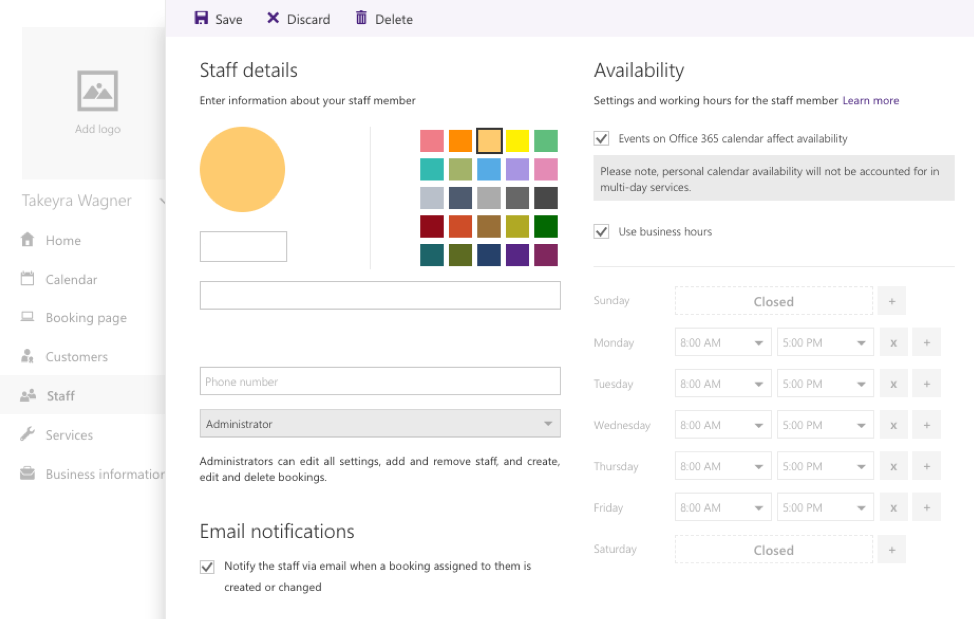
On this page, you can add information about you including your office number and whether to receive email notifications (we recommend to keep this option checked).
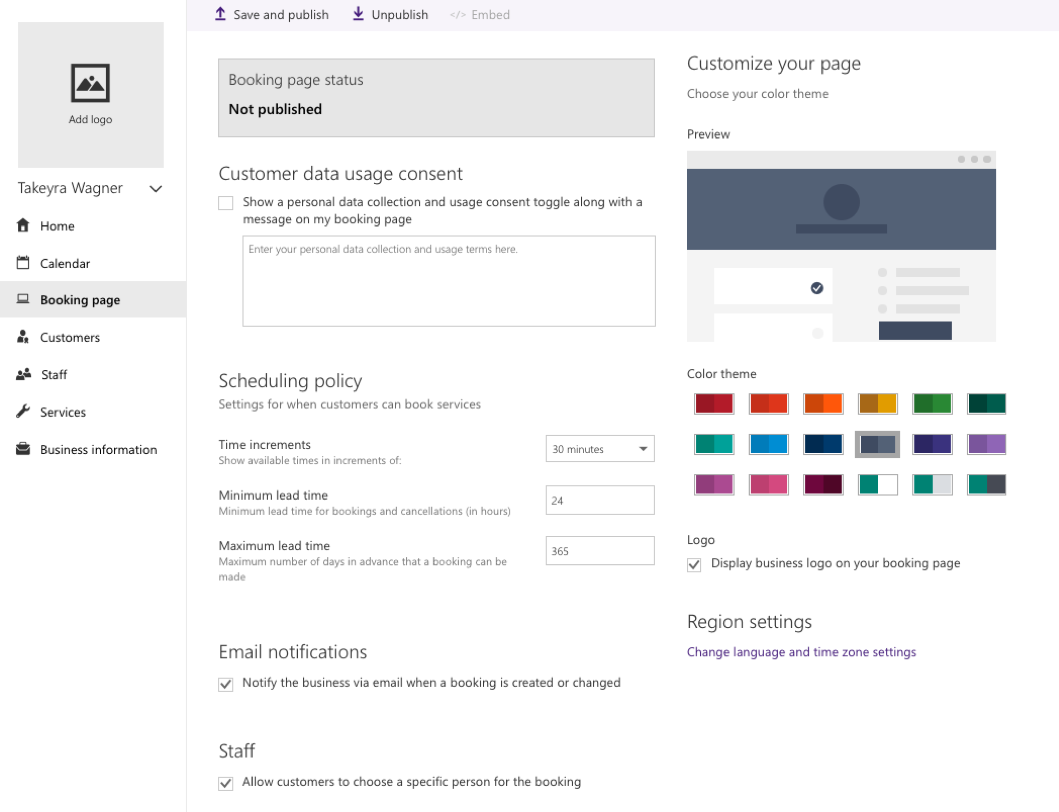
Next, select Booking page from the left navigation pane.
- Booking page Status: Since this is the first time you are setting up your Bookings page, your status is set to Not published. Once you finish customizing your page and clicking Save, the status will change to Published.
- Customer data usage consent (optional): Where you can customize a message for your visitors to consent to your site collecting their personal data.
- Scheduling Policy: Where you can set site-wide scheduling polices. We recommend the
following settings:
- Minimum lead time: 24
- Maximum lead time 30
- Email Notifications: Notifies you when an appointment is made.
- Staff: You can allow customers to choose who they want to meet with. However, you can uncheck this option if you do not have any staff.
- Customize your page: Choose a color theme for your bookings page. We recommend the purple theme!
- Lastly, click Save and Publish!
Once you click Save and publish, your Bookings site is now live! You can view your
published page by clicking Open published page and share your page with others by copying the link.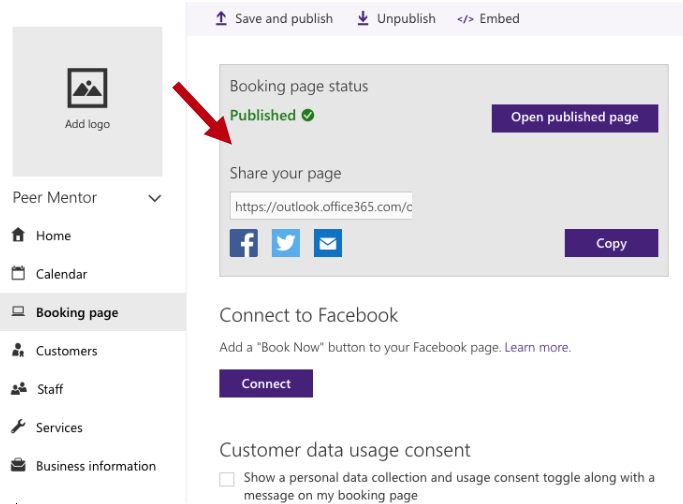
Have you ever spent more time deciding when to meet than actually meeting? Outlook Scheduling Poll is a feature within Outlook that faculty and staff can utilize to help decide on meeting times. Instead of dealing with endless email messages, chats, and calendar conflicts, use a scheduling poll to save time and reduce back-and-forth when trying to find a time that works for everyone.
Eligibility
- Available to: Faculty, and Staff.
Create a Outlook Scheduling Poll
To create a scheduling poll:
-
Select New event or right-click a time on your calendar and select New event.
-
Add attendees.
-
Select the date and time area and then select the first day that you would consider for your event. The date you select here will influence the poll time option recommendations that you get (recommendations will be after that date).
-
Select Scheduling Poll (calendar icon towards the top right of your invitation).
-
Review the suggested time options (these times are based on the best attendee availability). Choose which times you would like to include as options. To move to another day, use the > and < options next to the calendar date.
- Note: Currently, you can include up to 15-time options in a poll, however 3-5 options are recommended, so attendees don’t get overwhelmed when voting.
-
Add the rest of your meeting information if you haven’t already (title, room, agenda, attachments) and select Create Poll. The scheduled poll will open a new email inviation to be sent out to your attendees. When you are done, select Send.
- Your Meeting Invitation window will remain open while the voting is done for your poll.
Holds are Reserved on Everyone's Calendar for Each Scheduling Poll Time Option
To make sure other meetings aren’t scheduled over your meeting’s time options, holds are created on everyone’s schedules as soon as a poll is sent.
For organizers, all time option holds appear as Busy.
For attendees, all time option holds appear as Tentative until they vote.
-
If an attendee votes Yes on a time option, the hold appears on their calendar as Busy.
-
If an attendee votes No on a time option, the hold appears on their calendar as Free.
-
If an attendee doesn’t vote on a time option, the hold appears on their calendar as Tentative.
How to Vote in a Scheduling Poll
Once attendees receive the scheduling poll email in their inbox, they can vote on their preferred times. There are a few different ways to vote.
Vote from the Scheduling Poll Invitation Email
-
Open the scheduling poll email in your inbox.
-
Review the time options.
-
Vote Yes for times you like, and No for times that you don’t like or don’t work for your schedule.
Vote from Your Calendar
- Once a scheduling poll is sent by the organizer, tentative holds are placed on attendees’ calendars and are labeled HOLD in the title. To vote, click the meeting on your calendar grid, select Yes or No for each time option, and then select Submit vote.
Vote from the Event
- Attendees can vote on scheduling poll times directly from the event. Double-click the event on your calendar to open it and vote.
Vote from the Secure Scheduling Poll Voting Webpage
- When a scheduling poll is created, a corresponding secure webpage is also created and a link to that page is included in the scheduling poll email. Anyone can use the webpage to vote, and it’s the only way that people outside of your organization can vote for the times they prefer.
Review Voting Results and Choose a Final Time
After all attendees have voted, the organizer can choose the final event time(s).
-
Open the event.
-
Choose the time with the most Yes votes.
-
Select End poll with selected option.
All holds will be removed from everyone’s calendar, and the event will be updated with the final time.
Additional Information and Instructions
For more detailed instructions and features, Microsoft provides further information on how to utlize Outlook Scheduling Poll here:
Microsoft Forms is a simple, lightweight app in Office 365 that lets faculty and staff quickly and easily create custom surveys, questionnaires, polls, and more. When you create a form, faculty and staff can invite others to respond to it using any web browser, even on mobile devices. As results are submitted, you can use built-in analytics to evaluate responses. Form data can be easily exported to Excel for additional analysis. This would be an alternative to using other services such as Survey Monkey. LSUE's Forms environment is accessible through https://www.lsue.edu/office.
Eligibility
Microsoft Forms is available to all currently employed faculty and staff at LSUE.
General Information
- Add an LSUE logo to your form header and set your design color to LSUE colors
- Forms will display properly on desktop browsers and mobile devices
- Access to forms can be restricted to users within LSUE only or open to anyone
- Each user can create up to 200 forms
- Forms can have start and end dates
- Email notifications can be sent to the user who created the form and also to the end-user if desired
- Responses can be exported easily into Excel
Where Do I Begin?
Microsoft provides several short overviews on Forms within the following Microsoft Support area.
Accessing Forms
Microsoft Forms can be access through LSUE's Office 365 Portal.
OneDrive for Business is a cloud storage service from Microsoft that is included within LSUE's Office 365 environment. It allows you to store all your important files securely in one place and then access them from basically anywhere. The service comes with 1TB of storage space.
OneDrive works just like a traditional computer hard drive, but stores data in the cloud. Thanks to its cross-platform design, users can create files on their computer and pick up where you left off from a different device such as your laptop, tablet, or phone without having to save a copy on a USB drive. OneDrive allows users to save private files, make files public, share files with contacts, and create files for use with many Microsoft products. LSUE's OneDrive environment is accessible through https://www.lsue.edu/office.
Below are common steps around getting started with OneDrive. Click on each to expand on the subject.
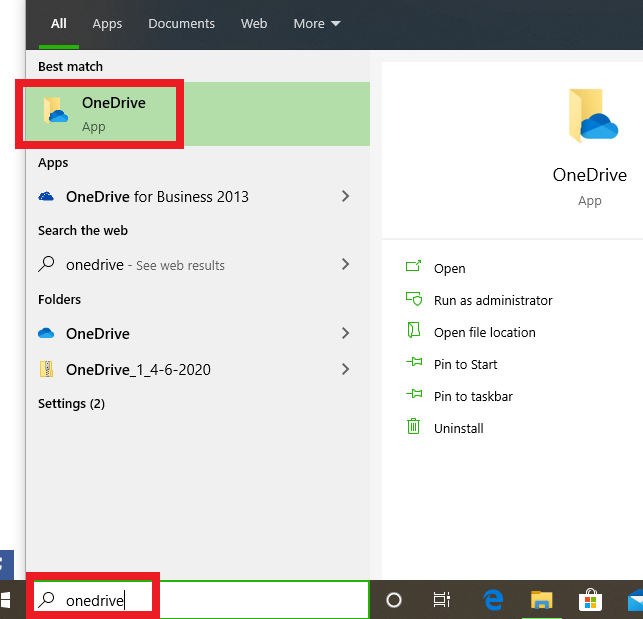
- Click Start or hit the Start Button and type OneDrive.
- Select the top result.
- Enter your LSUE email address and click Sign In.
- Enter your network password (the password you used to log in to the computer) and click Sign In.
- Click Next and go through the welcome tips.
- Open File Explorer.
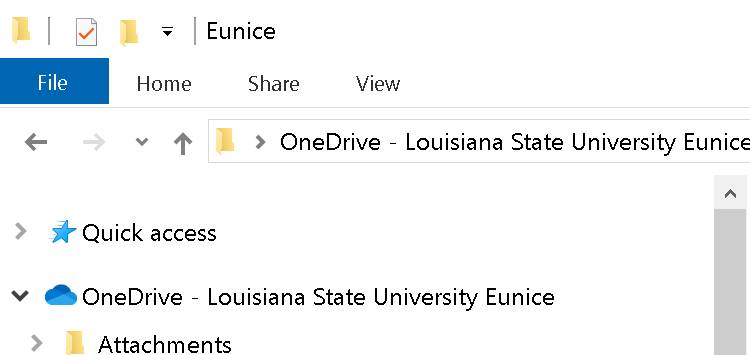
- Open your OneDrive-Louisiana State University Eunice folder using the pane on the left.
- Drag and drop or copy and paste content into this folder.
OneDrive uses different icons to represent the status of the app or file syncing.
The OneDrive app icon (at the bottom right of your screen):
- Solid White Cloud - OneDrive is running without problems and the sync is up-to-date.
- Solid Blue Cloud - OneDrive for Business is account is setup; OneDrive is running and all files are synced.
- Solid Gray Cloud - OneDrive is running but you are signed out or OneDrive is not connected to any account.
- Cloud with Two Arrows Making a Circle - OneDrive is actively uploading or downloading files/folders.
- Red Circle with a White "X" - OneDrive is running but there is a sync problem.
OneDrive file and folder icons (when viewing the OneDrive folder in file explorer):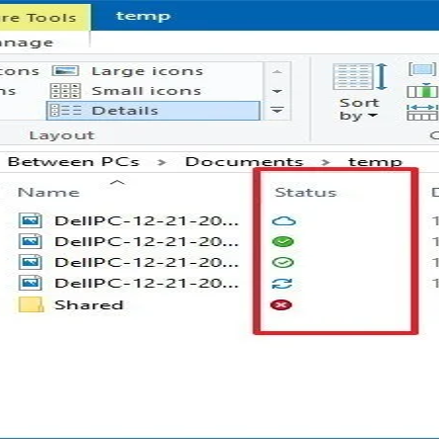
- White Cloud with Blue Borders - The file is only available when you're connected to the internet, and it's not using local storage. You'll need to double-click the file to finish the download and open with an application.
- Solid Green Circle with a White Checkmark - You are using the "Always keep on this device" option and this file is available offline.
- White Circle with Green Outline and Check Mark - File is available offline, you can open them without an internet connection, and they're taking up local storage space.
- Arrows Making a Circle - File is currently syncing.
- Red Circle with an "X" - There is a problem syncing this file.
If you want to choose which folders stored in the cloud should be accessible from your computer. You can follow these instructions to change your selections. All files will be visible on the web version of OneDrive.
- Click on the cloud icon at the bottom right of your screen.
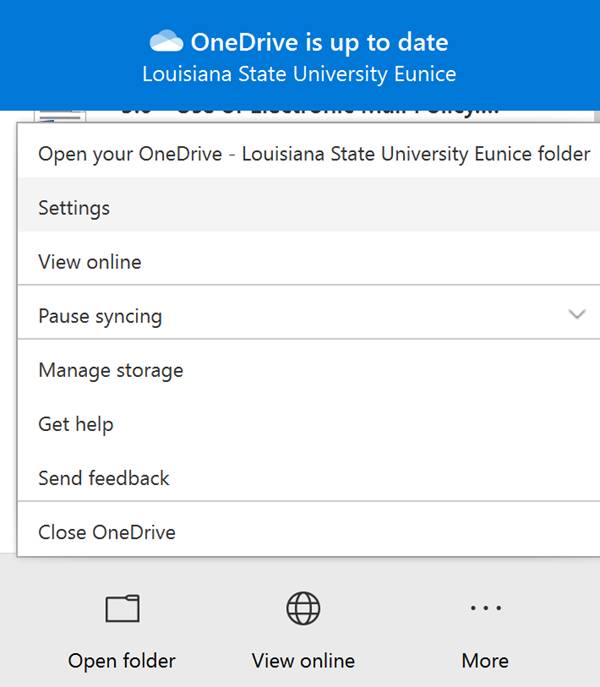
- In the window that opens, click the three dots icon in the top right corner and choose Settings.
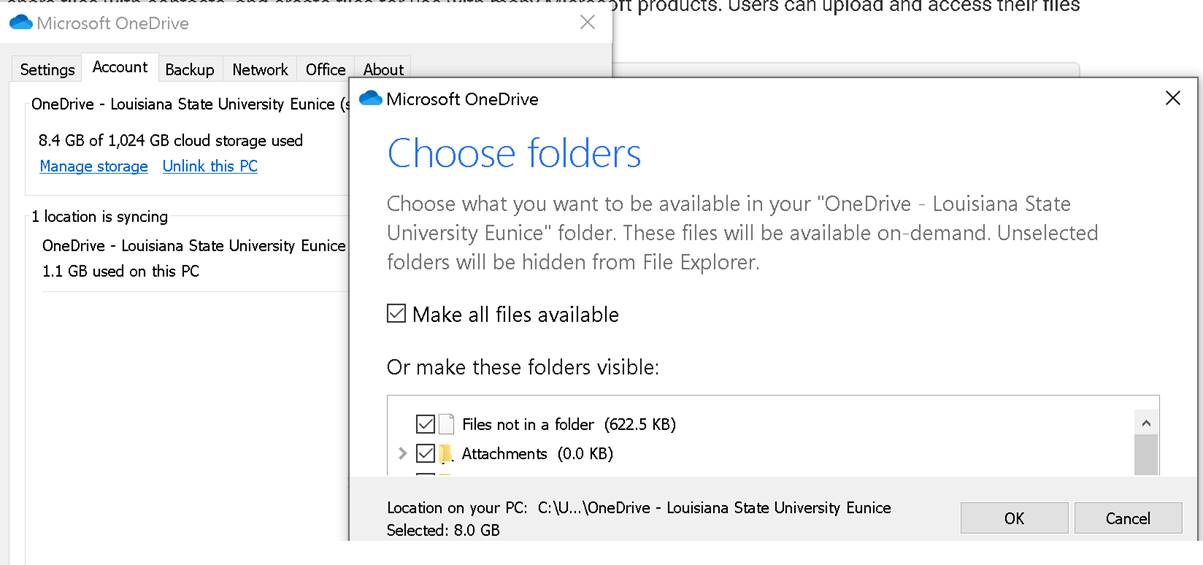
- Click the Account tab and click Choose Folders.
- Un-check Make all files available.
- Check the folders you want to make visible and click OK.
- Click OK again.
To share a file:
- Right click on the file and select Share.
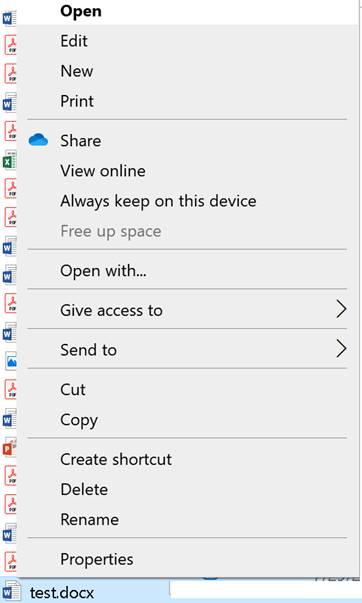
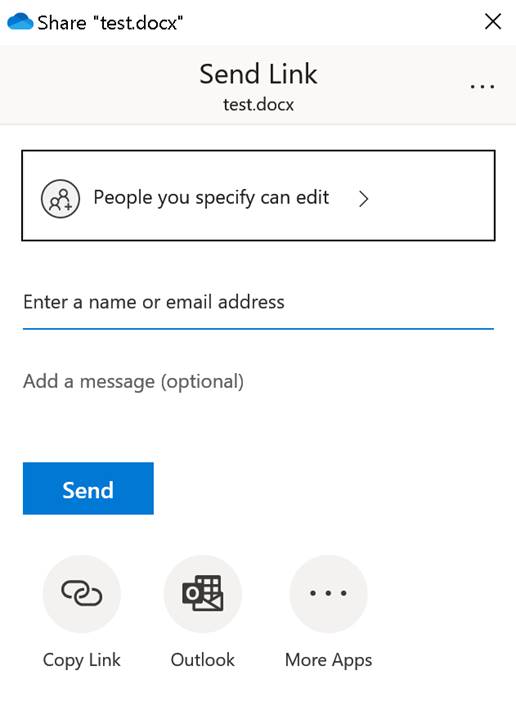
- Select your permission settings.
- Enter a person's name or email address and hit Send or click copy the link.
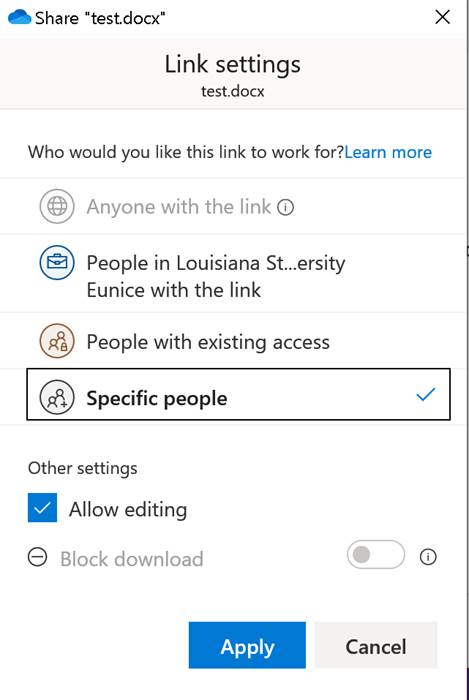
To stop sharing a file:
- Right click on the file and select Share
- Click the three dots icon in the top right corner.
- Select Manage Access
- Click the X to remove the link.
Microsoft Planner is a lightweight project management tool available for employees that works well for small projects and tasks. With Microsoft Planner, you can manage project plans, assign tasks, and chat about tasks.
Eligibility
Microsoft Planner is available to all currently employed faculty and staff at LSUE.
Accessing Planner
Microsoft Planner can be access through LSUE's Office 365 Portal. To access Planner, in the All Apps menu, choose Planner.
Available Microsoft Resources
Microsoft has many resources available that will help you to get started using Planner:
Microsoft Stream is an enterprise internal video service where LSUE users can view shared videos and also create short videos (15 minutes or less) or upload additional videos securely. Faculty and staff can share recordings for meetings, presentations, team training, classes, or other videos that aid in collaboration.
LSUE's Stream environment is accessible through https://www.lsue.edu/office. In order for faculty and staff to have access to upload or create content within Stream, please Contact OIT.
Eligibility
Microsoft Stream is available for all currently employed faculty and staff at LSUE to create, upload, or view videos and also for students to view shared videos.
General Information
- Easily create short videos of 15 minutes or less
- Upload/store videos you create through other tools (can be longer than 15 minutes)
- Videos are only viewable by the video uploader by default
- The uploader will need to share the videos with users and groups that need access
- Users can search for text or spoken words within videos
- Enhanced accessibility is available for everyone with closed captioning
- Individuals can use channels and groups to organize and grant permissions to their videos
- Office 365 Groups can be used to collaborate and share Microsoft Stream videos with a particular set of users
- Group creation is restricted. Please contact OIT if you would like to create a group
Accessing Stream
Microsoft Stream can be access through LSUE's Office 365 Portal.
Where Do I Begin?
In order for faculty and staff to have access to upload or create content within Stream, please Contact OIT.
Microsoft provides several short overviews on Stream within the following Microsoft Support area.
Microsoft Teams is Office 365's hub for teamwork and is available for faculty and staff use. It is a collaboration tool that provides employee teams with the ability to work together and share information via a common space. You can utilize features like document collaboration, one-on-one chat, team chat, and more. Microsoft Teams is also fully integrated with many other Office 365 services. Microsoft Teams can be access through LSUE's Office 365 Portal or the Teams desktop and mobile application.
Features
- Document collaboration
- Persistent one-on-one/group chat
- Persistent Team chat
- Meetings/Calls
- Integration with other Office 365 apps
Notes about Microsoft Teams at LSUE
- Microsoft Teams at LSUE is for internal collaboration only. However, external people can attend meetings in Teams.
- A Microsoft Team is not required to use one on one chat, group chat, and meeting functionality in the Microsoft Teams application.
- Placing a voice/video call to another employee through Teams is available. However, placing a call to a phone number outside of campus is not.
- Ad-hoc creation of new teams is disabled at LSUE. Please contact OIT to request a new Microsoft Team.
- The Teams desktop app is loaded onto faculty and staff computers as part of the normal computer setup.
Accessing Teams
Microsoft Teams can be access through LSUE's Office 365 Portal or the Teams desktop and mobile application.
Training and Support?
Microsoft provides a general short overview on Teams within the following Microsoft Support area.
Visio is an application that lets users map processes using a variety of graphical
options. With Visio Online (Plan 1), LSUE students, faculty, and staff can view, edit,
and share Visio diagrams on the web. You can add shapes, text, and pictures connecting
them to show relationships within numerous templates including basic flowcharts, process
diagrams, and more. Visio Online provides basic Visio functionality utilized within
your web browser.
Eligibility
Microsoft Visio Online is available for all students and currently employed faculty and staff at LSUE.
Accessing Vision Online
Microsoft Visio Online can be access through LSUE's Office 365 Portal.
Where Do I Begin?
Microsoft provides training information around Visio at the following location. With the link below, do keep in mind that Visio Online (Plan 1) is a basic version of Visio.
Moodle is a learning management system (LMS) - a software package designed to help educators easily create quality online courses. myCourses is LSUE's version of Moodle. myCourses is the online platform that hosts all of the courses and their content, including syllabi, assignments, grades, instructor contact information, forums, and more.
NetTutor is online tutoring available for LSUE students when it is needed the most! NetTutor helps students discover their strengths and develop a growth mindset with 1:1 24/7 professional tutoring while also helping all learners confidently progress in the classroom and beyond.
Accessing NetTutor
Students access NetTutor through the Tutoring Services page. Login to the system by using your Bengal Account credentials.
Resources
Whether it is for you to peruse or to share with others, we have some handy NetTutor resources you can watch, download and print.
Panopto is a video platform which includes software for recording and live streaming video, a portal for storing and managing your videos, a search engine for finding content inside your videos, and interactive video players. Panopto is a great resource for recording lectures and supplemental video tutorials to improve student learning in and outside of the classroom, and is available to active LSUE faculty and staff.
What is Pearson MyLab & Mastering?
MyLab and Mastering is the world's leading collection of online homework, tutorial, and assessment products designed to improve the results of higher education students.
Pearson offers integration between Moodle / myCourses and the MyLab & Mastering products.
Access to MyLab & Mastering
To create the connection to MyLab & Mastering products, instructors will need to add the Pearson MyLab & Mastering block to the course within Moodle / myCourses. This will automatically create a link in the top section of the course.
Once the link has been added, instructors will be able to use the link to go to Pearson and configure the MyLab & Mastering course materials. Students will be able to use the link to access the MyLab & Mastering course materials and assignments.
Need Assistance?
For faculty assistance with Pearson MyLab & Mastering or Moodle / myCourses integration, please contact the Faculty Technology Center (FTC).
ProctorU is an online exam proctoring solution that offers a powerful, convenient,
and secure alternative to traditional test centers. It is a secure, live, online
proctoring service that allows students to complete their assessment at location other
than the classroom. This can be a convenient option for students who are taking courses
at a distance.
Students will need to be certain to have the following in order to take an exam with ProctorU:
- A strong Internet connection
- A working webcam
- A functioning microphone
- A private, quiet and well-lit area
- Downloaded the ProctorU web browser called Guardian. Guarian is required for all exam proctoring through ProctorU and can be downloaded here: https://guardian.meazurelearning.com/ Note: If you check out a laptop from the Library, you will need to come by OIT locationd within the Community Education building (C-204) to have the browser installed.
Getting Started with ProctorU
For a complete overview of the ProctorU service for both students and faculty, please visit the Getting Started with ProctorU portal site for LSUE located at:
The ProctorU LSUE portal will provide:
- A short overview video of how the service works
- A link for you to create your ProctorU account (you will need create an account with ProctorU)
- A link for you to login to the ProctorU service with your ProctorU credentials you have created
- Information on downloading the ProctorU web browser called Guardian
- Technical requirements for an exam taker's computer, Internet connection, etc... along with a link to test your equipment - Test Your Equipment Here
- An "exam readiness" guide - Exam Readiness Guide
Faculty Information for ProctorU
LSUE's ProctorU Support team has updated their content for you to share within your course syllabus.
- Live+ syllabus language (most commonly used option)
- Record+ syllabus language
Privacy Considerations Provided by ProctorU
Stay Informed During an Emergency
LSU Eunice has partnered with RaveAlert, a provider of emergency notification systems, to enable alerts for all faculty, staff, and students. The system will allow you to receive emergency information updates via email, text messaging, and if necessary via voice.
Faculty, staff, and current students are automatically enrolled in the system. Students are activated each semester upon completing the fee payment process. Please take a moment to verify your information and provide additional contact information as you like.
In the case of a large scale communications outage, RaveAlert will serve as one of our primary methods of pushing information to the campus community. Please take advantage of this service and update your information today.
Logon to myLSUE and click the Emergency Alert Tab to update your contact information
Rave does not charge subscribers to send or receive SMS messages. Standard or other messaging charges apply depending upon your wireless carrier plan and subscription details.
Once registered, you can opt out of SMS messages at any time by texting STOP to 67283 or 226787.
TurnItIn is a a feedback and plagiarism detection tool within Moodle / myCourses that helps to improve writing and engages students in the feedback process. Students can only use Turnitin if an instructor creates a Turnitin assignment in a Moodle / myCourses course.
TurnItIn will check work submitted for originality by comparing submissions against journal articles, stored student papers, and other writing across the internet. It also offers a grammar checker to help students improve their writing.
Graders can easily provide students with customized feedback or use the standard grademark tool for comments used frequently. Instructors can also create a Turnitin rubric or allow students to review each other's work. This activity can also be used to assess suspect submissions (e.g., assignments without works cited pages, assignments without drafts) even if no grade is assigned for the activity.
A Turnitin assignment produces a report as a result of the following variables, which can be refined by the instructor:
OriginalityCheck ensures original work by checking submitted papers against other web pages, student papers, and leading library databases and publications.
GradeMark is an online grading tool that helps save time and improve feedback, where standard and customized marks can be added on the student's document.
Where Do I Begin?
General instructions are available for viewing on the following TurnItIn Support pages:
Need Assistance?
TurnItIn technical support is available for faculty by emailing TurnItIn Support. For additional faculty assistance with TurnItIn or Moodle / myCourses integration, please contact the Faculty Technology Center (FTC).
Zoom is an enterprise conferencing tool with an easy, reliable, cloud platform for audio and video conferencing, collaboration, chat, and webinars across mobile devices, desktops, and telephones.


